AutoView - turning your blueprint into UI components (AI Code Generator)
1. Preface
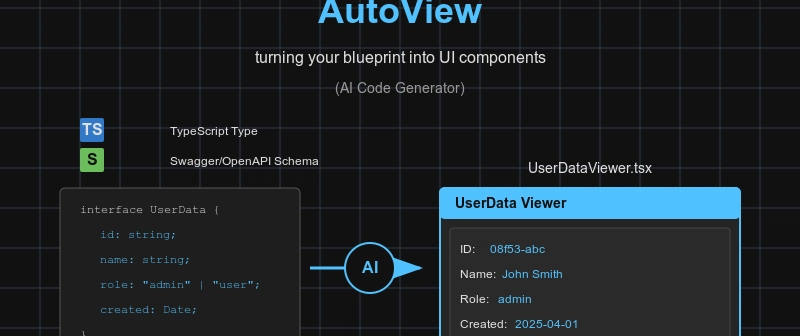
@autoview is an automated frontend builder that generates code using type information.
@autoview is a code generator that produces TypeScript frontend component from schema information. This schema information can be derived from either TypeScript types or Swagger/OpenAPI documents.
Frontend developers can use @autoview to significantly increase productivity. Simply define TypeScript types, and the frontend code will be generated immediately. You can then refine and enhance this code to complete your application.
For backend developers, simply bring your swagger.json file to @autoview. If your API contains 200 functions, it will automatically generate 200 frontend components. If there are 300 API functions, 300 frontend components will be generated automatically.
- GitHub Repository: https://github.com/wrtnlabs/autoview
- Playground Homepage: https://wrtnlabs.io/autoview
2. How to use
2.1. Playground
Visit our homepage to directly experience @autoview.
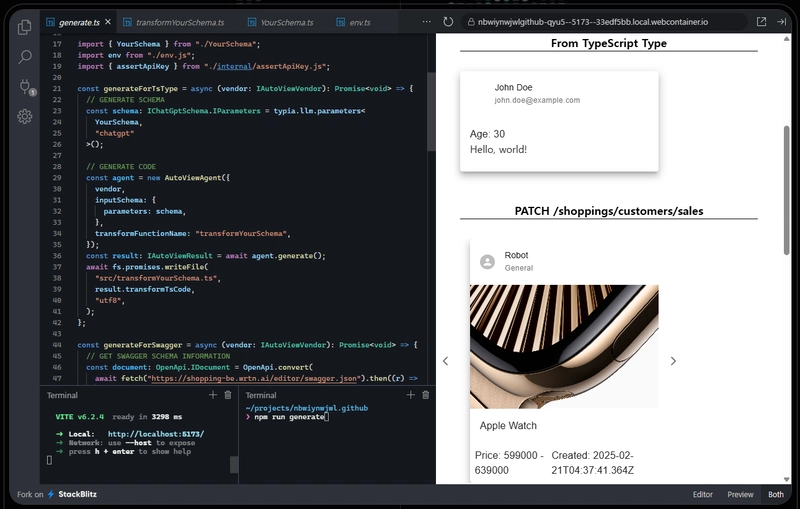
In the code editor tab (powered by StackBlitz), navigate to the env.ts file and enter your OpenAI key. Run npm run generate in the terminal to see how @autoview generates TypeScript frontend code from example schemas derived from both TypeScript types and OpenAPI documents.
You can replace the provided schemas with your own to generate customized TypeScript frontend code without installing @autoview locally. This playground approach is recommended for its convenience.
2.2. TypeScript Type
import { AutoViewAgent } from "@autoview/agent";
import fs from "fs";
import OpenAI from "openai";
import typia, { tags } from "typia";

interface IMember {
  id: string & tags.Format<"uuid">;
  name: string;
  age: number & tags.Minimum<0> & tags.Maximum<100>;
  thumbnail: string & tags.Format<"uri"> & tags.ContentMediaType;
}

const agent: AutoViewAgent = new AutoViewAgent({
  vendor: {
    api: new OpenAI({ apiKey: "********" }),
    model: "o3-mini",
  },
  inputSchema: {
    parameters: typia.llm.parameters<
      IMember,
      "chatgpt",
      { reference: true }
    >(),
  },
});
const result: IAutoViewResult = await agent.generate();

await fs.promises.writeFile(
  "./src/transformers/transformMember.ts",
  result.transformTsCode,
  "utf8",
);
To generate frontend code from a TypeScript type, utilize the typia.llm.parameters<Schema, Model, Config>() function.
Create an AutoViewAgent instance with typia.llm.parameters<Schema, Model>() specifying the IMember type, then call the AutoViewAgent.generate() function. The TypeScript code will be generated and available in the IAutoViewResult.transformTsCode property.
After code generation, save it to your desired location for future use. This is how @autoview uses AI to generate TypeScript frontend code from a TypeScript type.
import { AutoViewAgent } from "@autoview/agent";
import fs from "fs";
import OpenAI from "openai";
import typia, { tags } from "typia";

interface IMember {
  id: string & tags.Format<"uuid">;
  name: string;
  age: number & tags.Minimum<0> & tags.Maximum<100>;
  thumbnail: string & tags.Format<"uri"> & tags.ContentMediaType;
}

// LLM SCHEMA GENERATION
const $defs: Record<string, IChatGptSchema> = {};
const schema: IChatGptSchema = typia.llm.schema<
  Array<IMember>,
  "chatgpt",
  { reference: true }
>({ $defs });

// CODE GENERATION
const agent: AutoViewAgent = new AutoViewAgent({
  vendor: {
    api: new OpenAI({ apiKey: "********" }),
    model: "o3-mini",
  },
  inputSchema: {
    $defs,
    schema,
  },
  transformFunctionName: "transformMember",
});
const result: IAutoViewResult = await agent.execute();

await fs.promises.writeFile(
  "./src/transformers/transformMember.ts",
  result.transformTsCode,
  "utf8",
);
Note that the typia.llm.parameters<Schema, Model, Config>() function only supports static object types without dynamic keys. If you need to generate frontend code for non-object types like Array<IMember>, you must use the typia.llm.schema<Schema, Model, Config>() function instead.
When generating a schema with the typia.llm.schema<Schema, Model, Config>() function, it's crucial to pre-define and assign a $defs variable of type Record<string, IChatGptSchema>.
2.3. Swagger/OpenAPI Document
import { AutoViewAgent } from "@autoview/agent";
import { OpenApi } from "@samchon/openapi";
import fs from "fs";
import OpenAI from "openai";
import typia, { tags } from "typia";

const app: IHttpLlmApplication<"chatgpt"> = HttpLlm.application({
  model: "chatgpt",
  document,
  options: {
    reference: true,
  },
});
const func: IHttpLlmFunction<"chatgpt"> | undefined = app.functions.find(
  (func) =>
    func.path === "/shoppings/customers/sales/{id}" &&
    func.method === "get",
);
if (func === undefined) throw new Error("Function not found");
else if (func.output === undefined) throw new Error("No return type");

const agent: AutoViewAgent = new AutoViewAgent({
  vendor: {
    api: new OpenAI({ apiKey: "********" }),
    model: "o3-mini",
  },
  inputSchema: {
    $defs: func.parameters.$defs,
    schema: func.output!,
  },
  transformFunctionName: "transformSale",
});
const result: IAutoViewResult = await agent.generate();

await fs.promises.writeFile(
  "./src/transformers/transformSale.ts",
  result.typescript,
  "utf8",
);
If you have a swagger.json file, you can mass-produce frontend code components.
Convert the Swagger/OpenAPI document to LLM function calling schemas using the HttpLlm.application() function, and provide one of them to the AutoViewAgent class. This allows you to automatically create frontend components for each API function.
Additionally, you can integrate your backend server with @agentica, an Agentic AI framework specialized in LLM function calling. By obtaining parameter values from @agentica and automating return value viewers with @autoview, you can fully automate frontend application development:
2.4. Frontend Rendering
//----
// GENERATED CODE
//----
// src/transformSale.ts
import { IAutoViewComponentProps } from "@autoview/interface";

export function transformSale(sale: IShoppingSale): IAutoViewComponentProps;

//----
// RENDERING CODE
//----
// src/SaleView.tsx
import { IAutoViewComponentProps } from "@autoview/interface";
import { renderComponent } from "@autoview/ui";

import { transformSale } from "./transformSale";

export const SaleView = (props: {
  sale: IShoppingSale
}) => {
  const comp: IAutoViewComponentProps = transformSale(sale);
  return <div>
    {renderComponent(comp)}
  </div>;
};
export default SaleView;

//----
// MAIN APPLICATION
//----
// src/main.tsx
import ReactDOM from "react-dom";

import SaleView from "./SaleView";

const sale: IShoppingSale = { ... };
ReactDOM.render(<SaleView sale={sale} />, document.body);
You can render the automatically generated code using the @autoview/ui package.
Import the renderComponent() function from @autoview/ui and render it as a React component as shown above.
3. Principles
import { FunctionCall } from "pseudo";
import { IValidation } from "typia";

export const correctCompile = <T>(ctx: {
  call: FunctionCall;
  compile: (src: string) => Promise<IValidation<(v: T) => IAutoViewComponentProps>>;
  random: () => T;
  repeat: number;
  retry: (reason: string, errors?: IValidation.IError[]) => Promise<unknown>;
}): Promise<(v: T) => IAutoViewComponentProps>> => {
  // FIND FUNCTION
  if (ctx.call.name !== "render")
    return ctx.retry("Unable to find function. Try it again");

  //----
  // COMPILER FEEDBACK
  //----
  const result: IValidation<(v: T) => IAutoViewComponentProps>> =
    await ctx.compile(call.arguments.source);
  if (result.success === false)
    return ctx.retry("Correct compilation errors", result.errors);

  //----
  // VALIDATION FEEDBACK
  //----
  for (let i: number = 0; i < ctx.repeat; ++i) {
    const value: T = ctx.random(); // random value generation
    try {
      const props: IAutoViewComponentProps = result.data(value);
      const validation: IValidation<IAutoViewComponentProps> =
        func.validate(props); //validate AI generated function
      if (validation.success === false)
        return ctx.retry(
          "Type errors are detected. Correct it through validation errors",
          {
            errors: validation.errors,
          },
        );
    } catch (error) {
      //----
      // EXCEPTION FEEDBACK
      //----
      return ctx.retry(
        "Runtime error occurred. Correct by the error message",
        {
          errors: [
            {
              path: "$input",
              name: error.name,
              reason: error.message,
              stack: error.stack,
            }
          ]
        }
      )
    }
  }
  return result.data;
}
@autoview reads user-defined schemas (TypeScript types or Swagger/OpenAPI schemas) and guides AI to write TypeScript frontend code based on these schemas.
However, AI-generated frontend code is not perfect. To guide the AI in writing proper frontend code, @autoview employs multiple validation feedback strategies:
The first strategy involves providing compilation errors to the AI agent. The AI learns from compiler feedback and produces correct TypeScript code in subsequent attempts.
The second strategy is validation feedback. @autoview generates random values for the given schema type using the typia.random<T>() function and tests whether the AI-generated TypeScript rendering function produces valid output. If validation fails, @autoview guides the AI agent to correct the function with detailed tracking information.
The final strategy is exception feedback. Even if the AI-generated TypeScript code compiles without errors, runtime exceptions may still occur. In such cases, @autoview guides the AI agent to correct the function using the exception information.
4. Roadmap
4.1. Screenshot Feedback
Learning from rendering results.
The current version of @autoview implements three feedback strategies: "compiler," "validation," and "exception." In the next update, @autoview will add "screenshot feedback."
When AI creates a new TypeScript transformer function for a user-defined type, @autoview will request an example value for that type, capture a screenshot of the result, and allow the AI agent to review the screenshot.
Since AI agents excel at analyzing and interpreting images, the next version of @autoview will provide an even more exciting experience.
4.2. Human Feedback
Conversation with users about rendering results.
The current version of @autoview is not a chatbot but a frontend code generator that uses only user-defined type schemas.
In the next update, it will support the AutoViewAgent.conversate() function for chatbot development. In this chatbot, users can guide AI in generating frontend code through conversation. While viewing the rendering result, users can request the AI to modify the frontend code with instructions like:
- Too narrow. Make it wider
- I want to enhance the title. Make it larger
- Too much detail. Make it more concise please.
4.3. Theme System
@autoview supports a theme system, allowing you to replace the default renderer @autoview/ui with custom options.
However, this custom theme feature is not yet documented.
In the next update, comprehensive documentation for custom themes will be provided.
5. Agentica
@agentica is an Agentic AI framework specialized in LLM function calling.
When you provide a TypeScript class to @agentica, its class functions are properly called in the AI chatbot. If you provide a Swagger/OpenAPI document, it becomes a chatbot that interacts with backend API functions.
By combining @agentica with @autoview, you can experience a transformed development workflow. Replace parameter input components with an @agentica-powered AI chatbot and automate return value viewers with @autoview. This represents one of the most promising approaches to AI-based frontend automation:
Below is an example code snippet and a demonstration video of this code in action. These examples illustrate the potential of Agentic AI in the future.
import { Agentica } from "@agentica/agent";
import { HttpLlm, OpenApi } from "@samchon/openapi";
import typia from "typia";

const agent = new Agentica({
  model: "chatgpt",
  vendor: {
    api: new OpenAI({ apiKey: "*****" }),
    model: "gpt-4o-mini",
  },
  controllers: [
    {
      protocol: "http",
      name: "shopping",
      application: HttpLlm.application({
        model: "chatgpt",
        document: await fetch(
          "https://shopping-be.wrtn.ai/editor/swagger.json",
        ).then((r) => r.json()),
      }),
      connection: {
        host: "https://shopping-be.wrtn.ai",
        headers: {
          Authorization: "Bearer *****",
        },
      },
    },
    {
      protocol: "class",
      name: "counselor",
      application: typia.llm.application<ShoppingCounselor, "chatgpt">(),
      execute: new ShoppingCounselor(),
    },
    {
      protocol: "class",
      name: "policy",
      application: typia.llm.application<ShoppingPolicy, "chatgpt">(),
      execute: new ShoppingPolicy(),
    },
    {
      protocol: "class",
      name: "rag",
      application: typia.llm.application<ShoppingSearchRag, "chatgpt">(),
      execute: new ShoppingSearchRag(),
    },
  ],
});
await agent.conversate("I want to buy a MacBook Pro");


